Stabilize External Camera Footage with GyLog and Gyroflow
This guide explains how to mount a smartphone on a mirrorless camera or another external camera, record gyro data with GyLog, and stabilize the camera footage afterward with GyLogSync and Gyroflow.
This is separate from the iPhone ProRes RAW workflow. In this workflow, the smartphone is not the recording camera. It is used as a gyro logger that records the motion of the external camera.
Download Links
- GyLog website
- GyLog for iPhone on the App Store
- GyLogSync for macOS
- GyLogSync for Windows
- Gyroflow Desktop and video editor plugins
What You Need
- A mirrorless camera, cinema camera, or other external camera
- A smartphone with GyLog installed
- A rigid holder, adapter, or cage that keeps the smartphone fixed to the camera
- GyLogSync
- Gyroflow Desktop
- A lens profile that matches the camera, lens, and recording mode
- A rolling shutter value, if needed
Basic Concept
GyLog records gyro data from the smartphone. If the smartphone is rigidly mounted to the external camera, the phone's motion can be treated as the camera's motion.
After shooting, use GyLogSync to cut the long .gcsv log into per-clip CSV logs. Then load the video and CSV log into Gyroflow and sync them. Gyroflow can use the gyro data to stabilize the footage.
For external camera workflows, these three things matter most:
- The smartphone must not move relative to the camera.
- The phone-to-camera mounting angle must be handled correctly.
- The video and
.gcsvtiming must be synced correctly.
GyLogSync and Gyroflow use timestamps and timing information as a starting point when matching the smartphone log to the camera video. Before shooting, set the smartphone and camera clocks as closely as possible.
Prepare Before Shooting
- Mount the smartphone firmly to the external camera.
- Match the smartphone and camera clocks.
- Choose the lens, focal length, resolution, and frame rate.
- Prepare the correct lens profile.
- Check the rolling shutter value if needed.
- Turn off all camera-side and lens-side stabilization.
For the lens profile, first check whether Gyroflow Desktop already has a profile that matches your camera, lens, and recording mode. If no matching profile is available, create one by following Gyroflow's official calibration process. See Create a Lens Profile for details.
If the camera has a companion app, use it to sync the camera clock with your phone. If you set the clock manually, try to get the smartphone and camera within about one second of each other.
They do not need to match at frame-level precision. Gyroflow Desktop can adjust the time offset using Rough gyro offset and its sync tools. However, if the clocks are far apart, finding the correct sync point becomes harder.
When using GyLog and Gyroflow for stabilization, turn off all camera-side and lens-side stabilization. If the camera or lens stabilizes the optical image separately from the phone, the gyro data recorded by the phone may not match the footage.
For shutter speed, start with 1/120 second or faster. If the shutter speed is too slow, motion blur will remain after stabilization. Gyroflow can correct camera movement, but it cannot restore frames that were already blurred during capture.
Record
- Put the camera on a tripod and level it, or place it on a mostly level surface.
- Mount the smartphone firmly to the camera.
- Open GyLog.
- Before recording the log, tap Calibrate Mount on GyLog's Record screen and always run Calibrate Mount.
- Tap Start in GyLog to begin recording gyro data.
- Record video on the external camera.
- After shooting, return to GyLog.
- Tap Stop.
- Send the
.gcsvfile from Files to your computer.
Calibrate Mount records the angle of the smartphone relative to the camera. Run it before starting the log, with the camera and smartphone fixed in the same position they will be in during shooting.
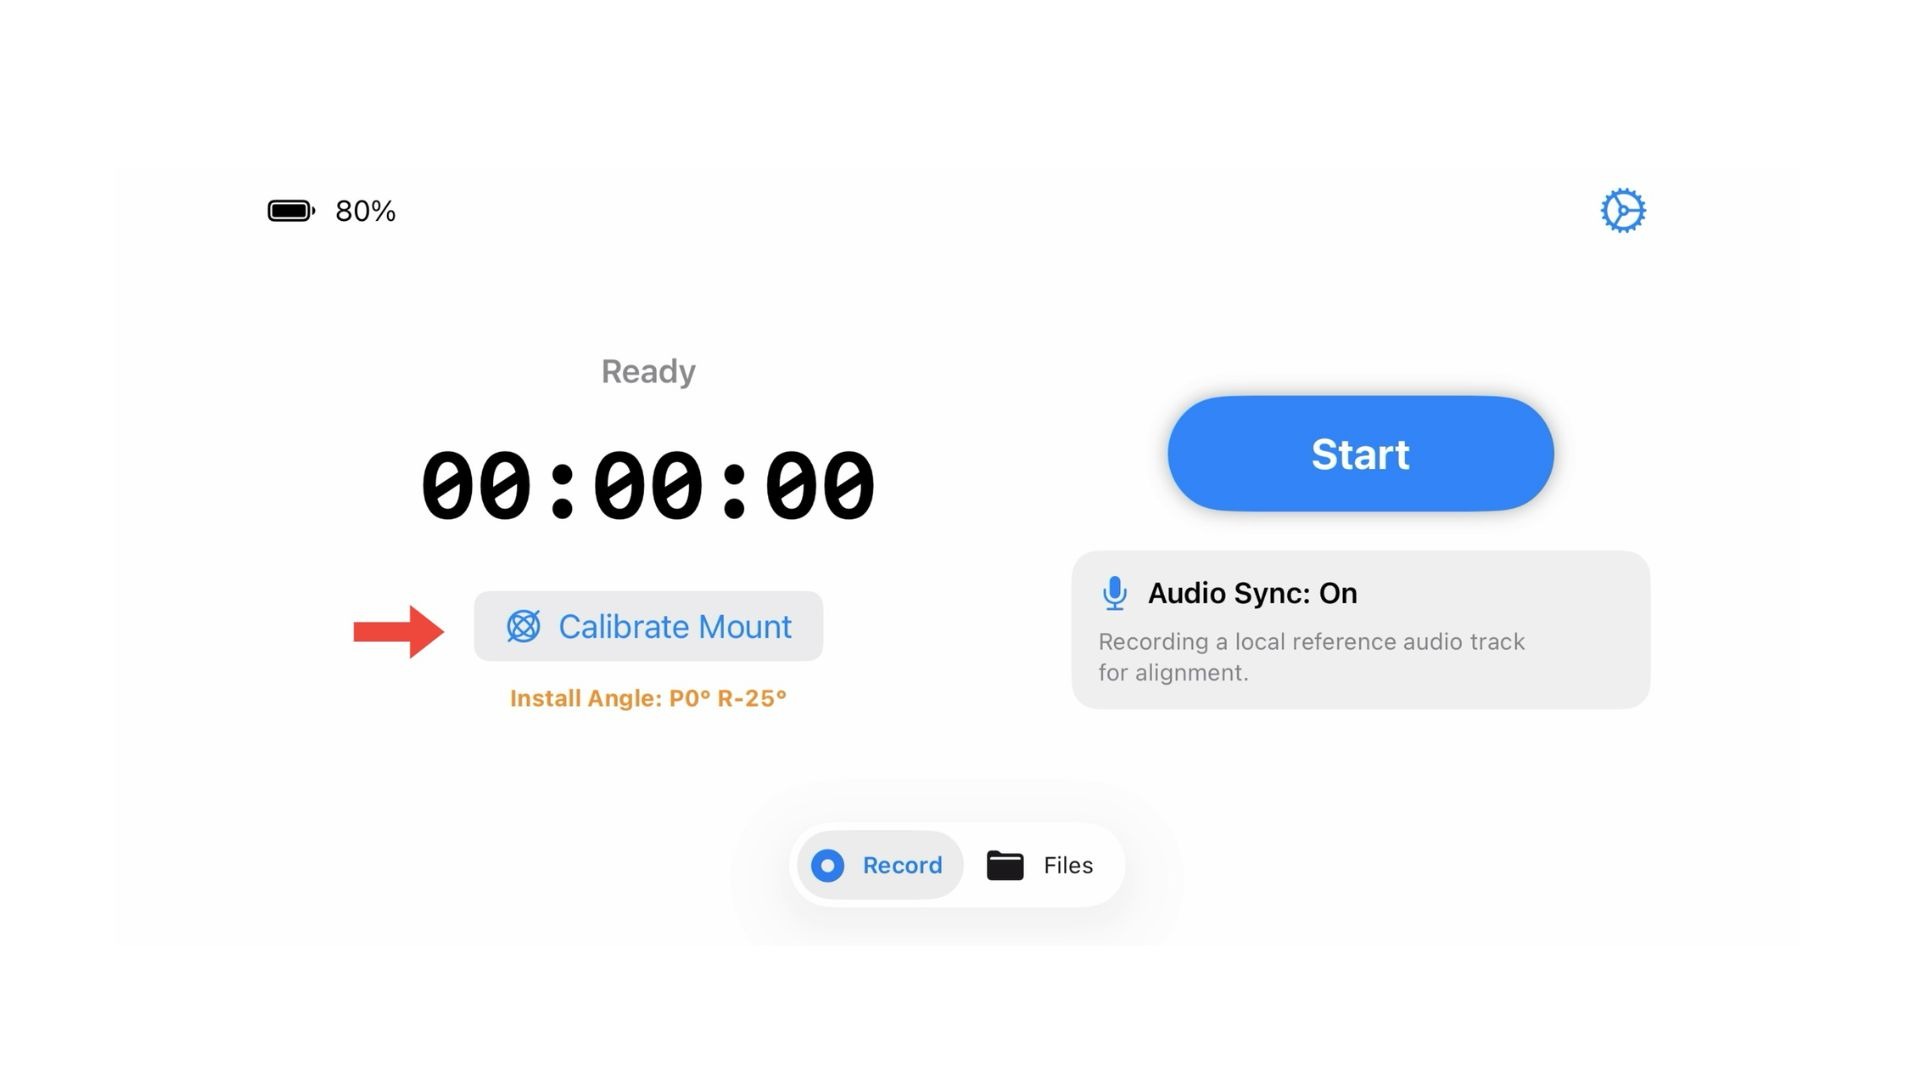
One GyLog recording can cover multiple video clips. Start GyLog before the first clip, and stop it after the last clip.
For important shoots, shorter logging sections are easier to verify than one very long recording.
Optional: Use the Smartphone as an External Monitor
With a third-party monitor app and a video capture adapter, you can monitor the external camera image on the smartphone while GyLog records the motion log.
In this setup, start recording the log in GyLog, then switch to the monitor app to check the external camera image. After shooting, return to GyLog and tap Stop to save the log.
This setup is optional. On iPhone in particular, it requires a compatible video capture adapter and monitor app, and it can be more difficult because of cost, compatibility, and stability.
Before using this for an important shoot, run a short test and confirm that GyLog continues recording correctly while the monitor app is open. Also make sure the capture adapter and cable do not loosen the smartphone mount.
Organize Files
On your computer, put these files in the same folder:
- The video files from the external camera, such as standard MOV or MP4 files
- The
.gcsvfile exported from GyLog
The lens profile does not need to be in the same folder as the video files or .gcsv. Save it somewhere easy to find.
Create Per-Clip CSV Logs with GyLogSync
Before syncing and stabilizing in Gyroflow, use GyLogSync to cut the long .gcsv into per-clip CSV logs.
- Open GyLogSync on your computer.
- Drop in the video files and
.gcsv, or the folder that contains them. - Check the required settings.
- Run Sync.
- Check the generated per-clip CSV logs.
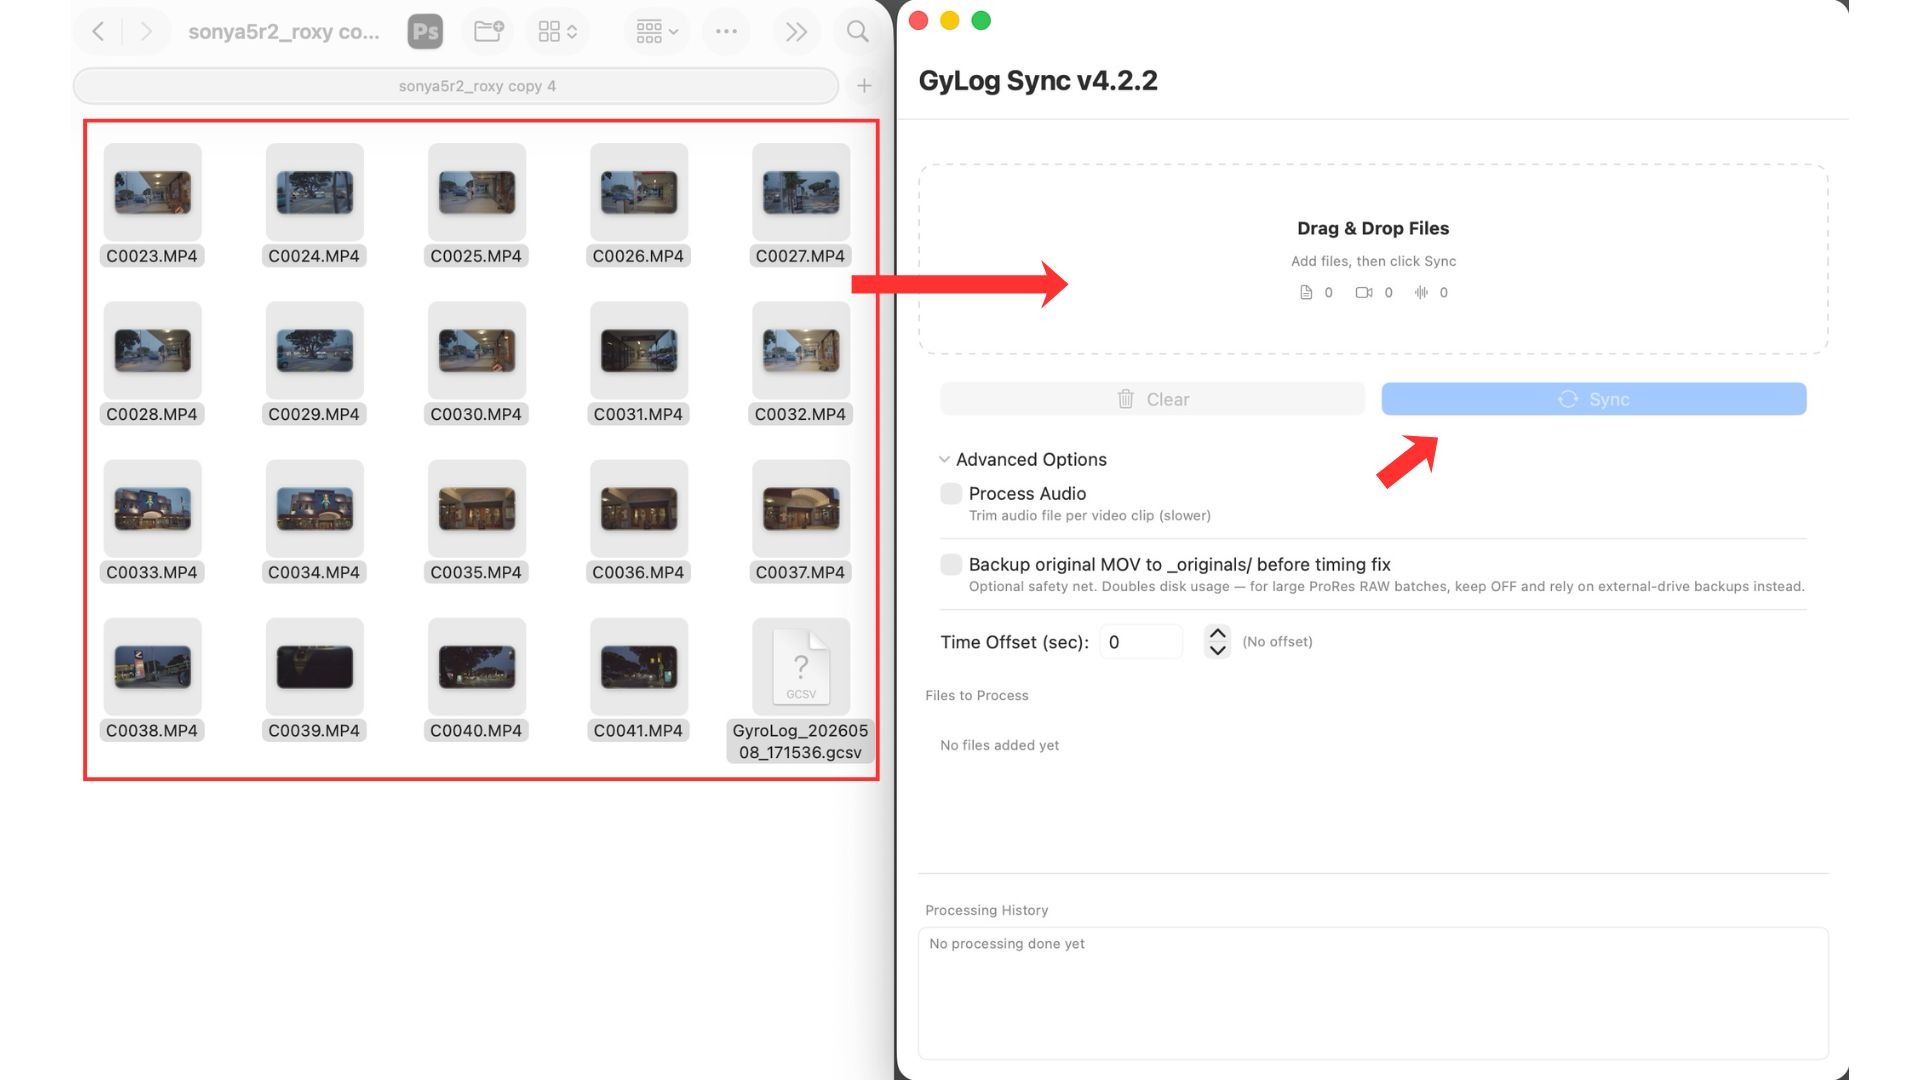
The CSV logs created by GyLogSync include about 5 seconds before the video starts and about 5 seconds after the video ends. The generated CSV logs are saved in the same folder as the original video files.
The per-clip CSV logs use the same base name as the original video files. For example, C0027.MP4 creates a CSV log such as C0027.gcsv.
In addition to the per-video CSV logs, GyLogSync also creates a summary CSV that lists which video was cut from which time range. Use this summary CSV to check the trimming details.
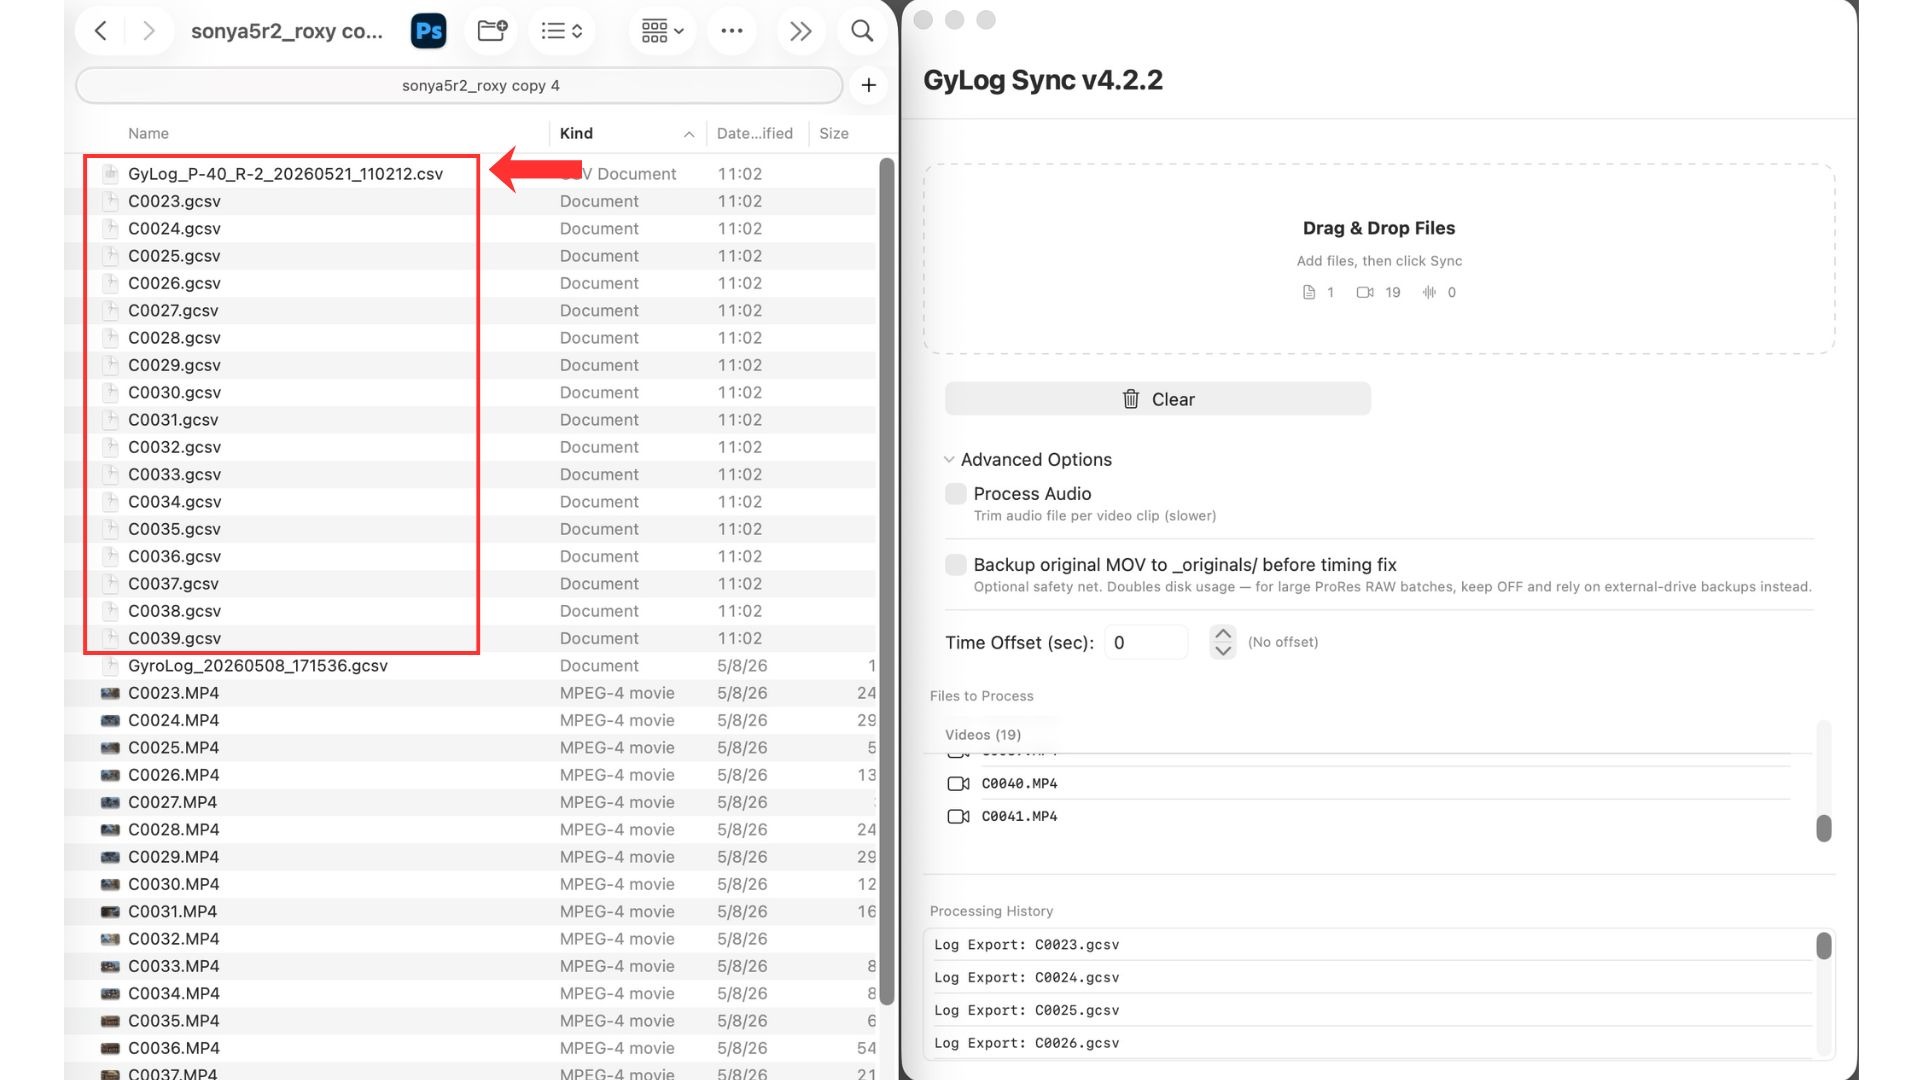
With external cameras, automatic trimming may depend on the camera's time and metadata. If it does not line up, adjust the offset manually in Gyroflow Desktop.
Sync and Stabilize in Gyroflow
- Open Gyroflow Desktop.
- Load the video file.
- Load the lens profile for the shot.
- Load the CSV log with the same file name as the video file.
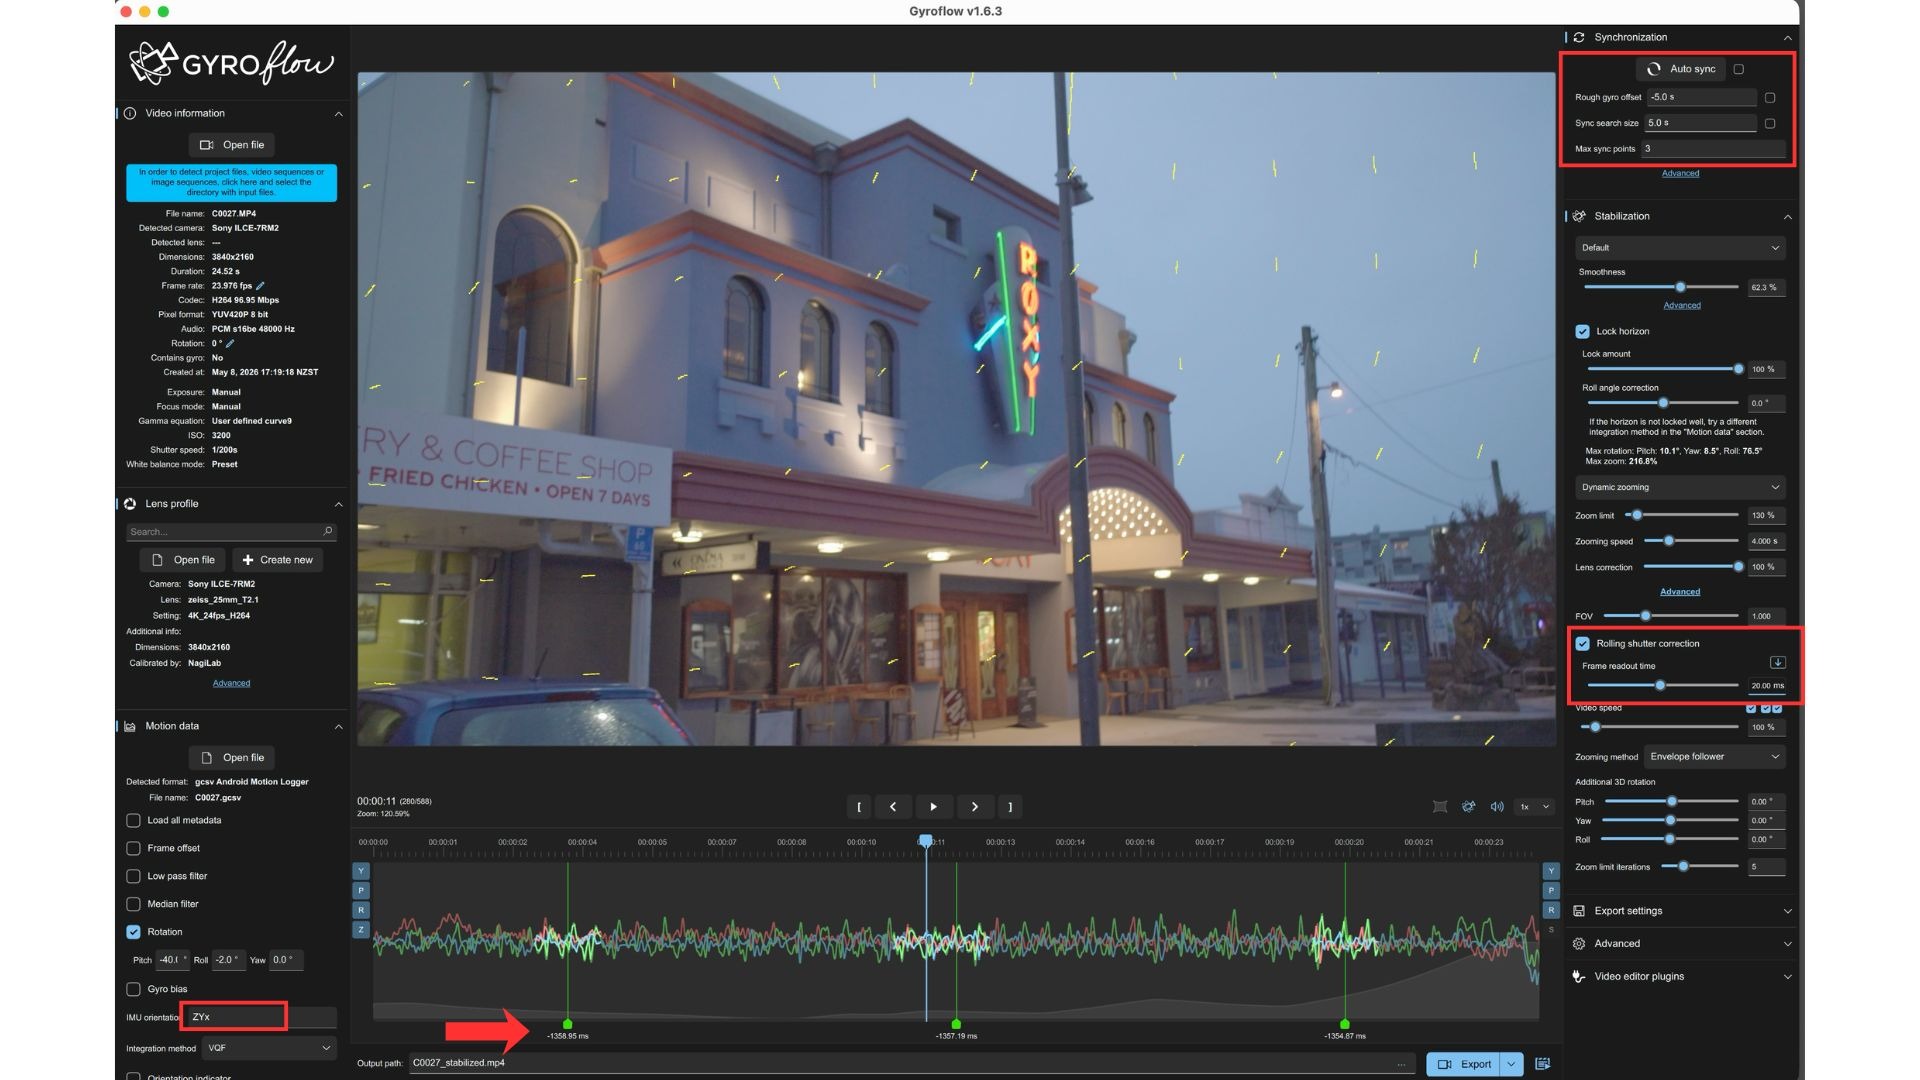
- Enter the mount angle in Rotation.
- Check IMU orientation.
- Set Rough gyro offset to around
-5.0seconds. - Run Auto sync.
- Adjust Smoothness, FOV, and Crop.
- Adjust rolling shutter correction if needed.
- If the result looks natural, export a project file or render the stabilized video.
Rotation
GyLogSync creates a summary CSV that shows how each clip was cut. The mount angle is written in the summary CSV file name.
The summary CSV file name looks like this:
GyLog_P-40_R-2_20260521_110212.csv
In the summary CSV file name, P is the Pitch angle, and R is the Roll angle. In this example, Pitch is -40 and Roll is -2.
In Gyroflow Desktop, open Rotation, turn on the Pitch and Roll switches, and enter the angles from the summary CSV file name. Check the summary CSV file name, not the per-clip CSV log file names.
Yaw is not included in this summary CSV file name, so this workflow enters Pitch and Roll. Check orientation differences with IMU orientation and the sync result.
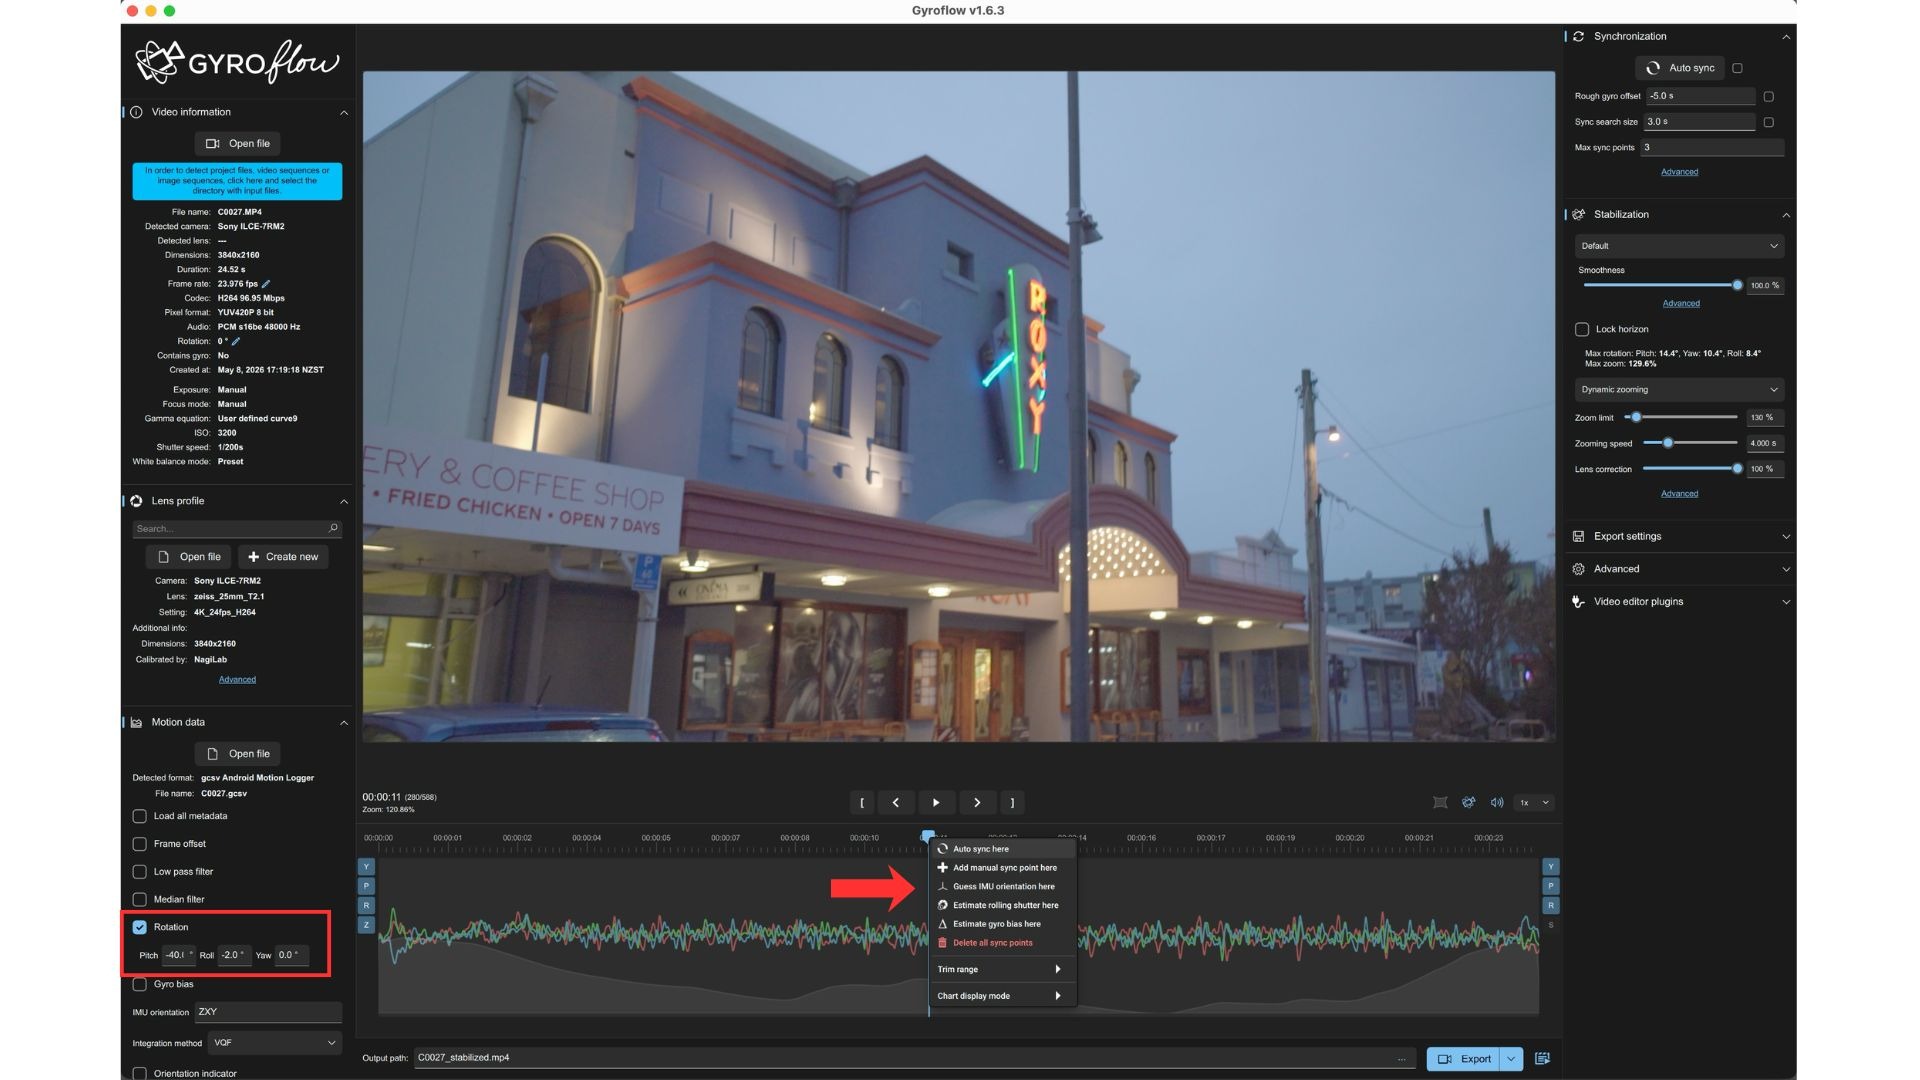
IMU orientation
When an Android smartphone is mounted to an external camera with the USB-C socket on the right side, IMU orientation is often ZYx.
To confirm the correct value, right-click on the Gyroflow Desktop timeline and run Guess IMU orientation here. Gyroflow will show the estimated IMU orientation. If you use an iPhone as the logger for an external camera, confirm it with Guess IMU orientation here in the same way.
Sync
The CSV logs created by GyLogSync include about 5 seconds before the video starts and about 5 seconds after the video ends.
For this reason, set Rough gyro offset to around -5.0 seconds in Gyroflow Desktop, then run Auto sync.
If sync works well, Gyroflow creates sync points on the timeline. If about three green sync point values are close to each other, the sync is roughly correct. If the values are far apart, check the video and CSV log pairing, offset, IMU orientation, Rotation, and lens profile.
Rolling Shutter
External cameras can show more rolling-shutter wobble or distortion than the iPhone-only workflow.
The rolling shutter value can change depending on the camera body, resolution, frame rate, and recording mode.
Check a value that matches the camera and recording mode. You can also shoot an easy-to-read test clip and adjust the value in Gyroflow until vertical lines and wobble look natural.
For reference sources and how to find a value, see Rolling Shutter Correction.
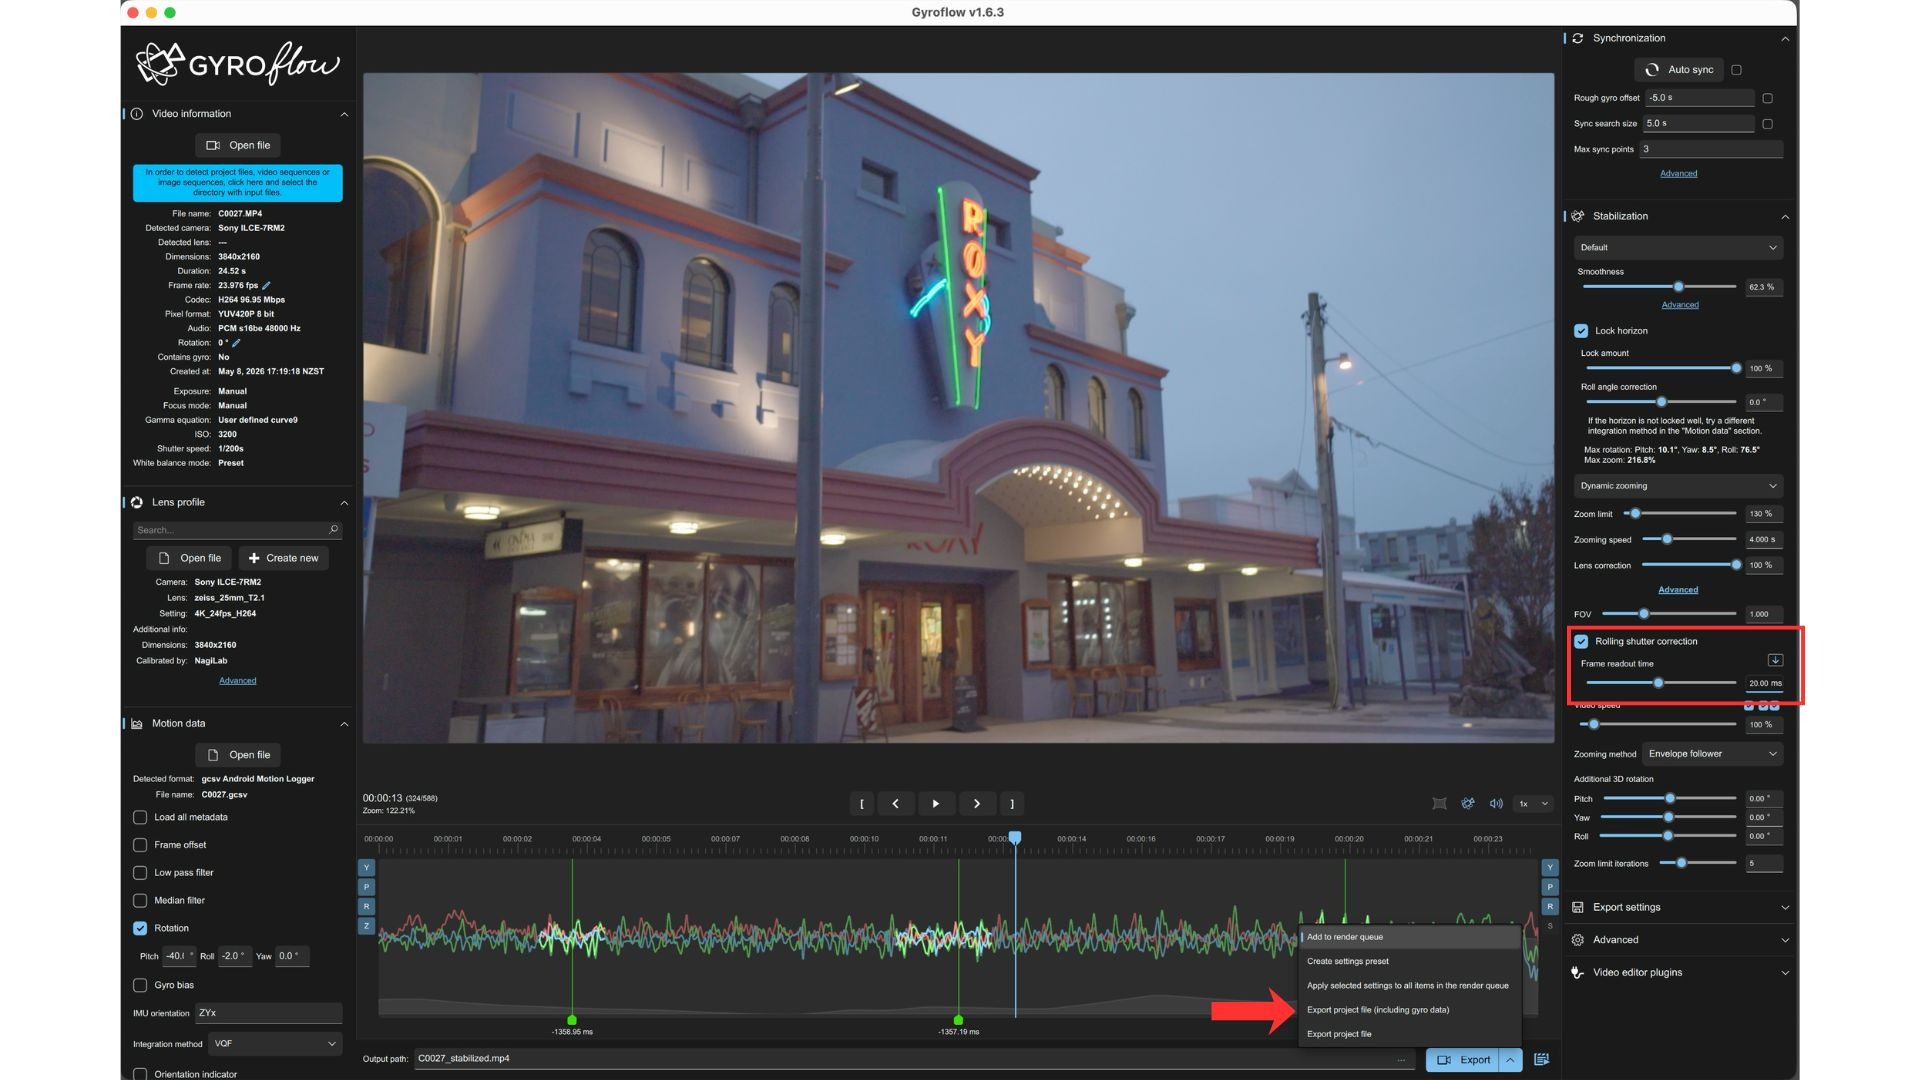
After choosing the rolling shutter value, export the project file from Gyroflow Desktop. Fine tuning such as Smoothness, FOV, and Crop can still be adjusted later in a Gyroflow plugin inside a video editor such as DaVinci Resolve.
Check in a Video Editor
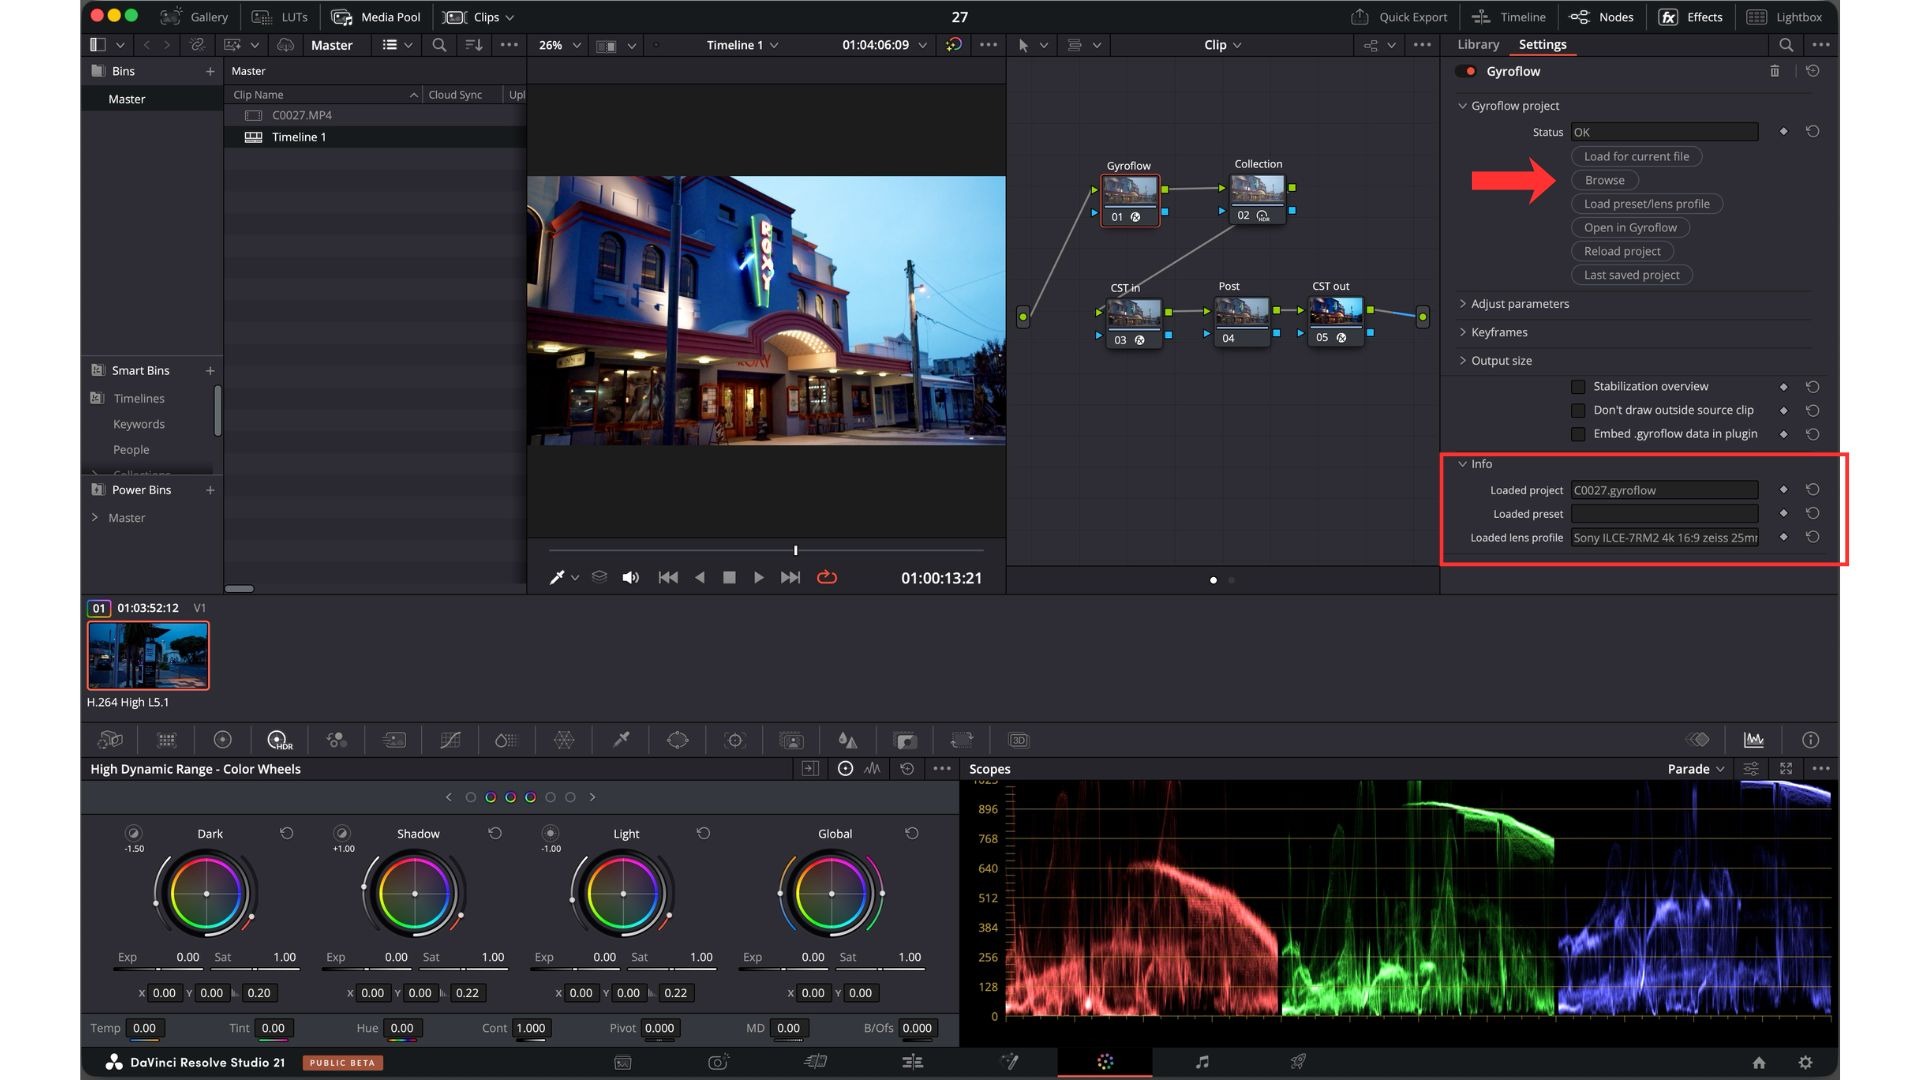
If you use a video editor that supports the Gyroflow plugin, such as DaVinci Resolve, load the .gyroflow project exported from Gyroflow Desktop and confirm it there.
- Open the video in the editor.
- Add the Gyroflow plugin.
- Load the
.gyroflowproject exported from Gyroflow Desktop. - If needed, confirm the lens profile in the same plugin.
- Fine tune Smoothness, FOV, Crop, and related settings.
In the Gyroflow plugin, confirm that the .gyroflow project and lens profile are loaded.
Common Issues
The stabilization drifts or does not match
The phone may not be mounted firmly, IMU orientation may be wrong, Rotation may be wrong, or Calibrate Mount may not have been run. If the smartphone moves relative to the camera during recording, the gyro data will no longer match the footage.
Large time differences between the video and the log can also make sync difficult. Match the smartphone and camera clocks before shooting, then adjust the time offset in Gyroflow Desktop if needed.
The edges look distorted
The lens profile may not match the recording mode. Use a profile made for the same camera, lens, focal length, resolution, frame rate, and distortion correction setting.
Vertical lines wobble or bend
Rolling shutter correction may be needed. Check the rolling shutter value for the camera and recording mode.
The result is stable but still looks blurry
The footage may contain motion blur from capture. Use a shutter speed of 1/120 second or faster for shots with stronger movement.
Notes
- For external cameras, the physical phone mount is the most important part of the workflow.
- Always run Calibrate Mount before starting the log.
- Turn off all camera-side and lens-side stabilization.
- Keep file names and shooting order clear when one log covers multiple clips.
- Lens profiles and rolling shutter values must match the camera and recording mode.
- Start with short 10 to 20 second test clips.
iPhone ProRes RAW has a more detailed workflow: